Friday, May 2, 2014

May Kitchen Update

We were on a roll, and then, spring happened.  Easter, good weather, a busy social calendar have all culminated in a halt to our progress.  I'm frustrated, because it has now been a year since we officially began this project, but I am still holding out hope that we can finish this project by the end of the summer. (Maybe a Labor Day celebration?)

What I have managed to do, is put hardware on the cabinets currently installed.


We selected handles that were similar in style to the hardware on the drawers of the island.  I like their modern simplicity.

I also marked where the open shelves will go:


(It's really difficult to tell from this photo, but the lines of my pencil are there!)
And I bought the materials to make said shelves.  I am still working up the courage to use the table saw to make my cuts.  Really, I need to just grow a pair and do it.

Meanwhile, we assembled and set out to install the pantry cabinet, and this is where we came to a halt, for the most part.  Originally, it was to go on the other side of the stove, but the thing is...it's just TOO BIG.  It's garish, and dominant; it fits, but just doesn't look right.  It doesn't work.

We tried putting it into another corner of the kitchen, and again, same problem:


It's an awesome cabinet, but just too huge!  It sticks out like a sore thumb.  I think it would work fine in another, much bigger kitchen.  But not ours.

So we have decided instead to invest in a lower cabinet next to the stove, and install more countertop.  This will be so much better; we'll still get storage, plus the extra bonus of more surface to work on.  We are also going to get an upper cabinet, and we might even just go ahead and install all upper cabinets for that side of the kitchen, and just have open shelving to the left of the sink. 

That's where we have been, stagnant, for several weeks now.  This coming week, however, I am determined to make more progress!!  


Thursday, March 6, 2014

Let's Stencil

I've been gradually making updates to the craft room upstairs.

I painted this closet, along with the doors, white; the other night I added stencils to the inside of the closet to give it more character.  I love stenciling closets; it makes for such a nice surprise when you open the doors.  It takes a normally drab storage space and makes it pretty fab, if I do say so myself!

So I already started stenciling when I remembered to take a "before" picture, so this photo is sort-of before:


The closet used to be an almond color.  The doors also used to be a faux-wood.  Blech.  In addition to painting the closet and doors white, I added new hooks to the insides of the doors.  Then, stencil:


The stencil is a Chicago star!


I couldn't find anything like it on Etsy, so I decided to make it myself.  It was super easy.  I downloaded an image of the Chicago star from Google, then edited the image to the size I wanted, and printed it on paper.  I cut the star out, then used it as a template to trace onto a piece of plastic mylar that I bought off Amazon.  Finally, I used an exact-o knife to cut the star out of the mylar, and voila!  A stencil is born.  The only nerve-wracking part was cutting the star from the mylar, because I wanted to make sure my lines were straight.  As you can see from the result above, it turned out pretty darn good!


It's starting to get REAL!

Okay, I'm embarrassed, but I should be honest: it took me about 90 minutes to put this cabinet door on.


It was the first door to go on our cabinets, and as we know, Ikea provides only vague cartoons for instructions, so I was left to deciphering their drawings and searching for youtube videos or instructions on the internet to understand just how the heck the hinges are to be installed.  I was also watching House of Cards at the time, so there were periods when I stopped and stared at the ipad as some drama unfolded.  

Once I figured it out, however, the rest of the doors have been a piece of cake!  

We accomplished a lot in the last week.  Most of my time was spent staining, sealing and finishing the butcher block countertops.  Before and after staining:


I chose a stain that would nearly match the color of the wood on the island.  I used Miniwax Colonial Maple:


Nice, isn't it?  I only put one coat of stain on, because in my homework I learned the sealant and finisher would further alter the color of the wood.  I used Waterlox sealer and finisher; this was recommended to us by a fellow Ikea customer, and I am so glad we found out about it.  This stuff is worth every penny.  I followed a questionnaire on the Waterlox website to find out which products I should purchase, and then I ordered directly from the company. Waterlox is not really sold anywhere in the Chicagoland area--just a couple of spots that would have been a haul for us to get to, so it made sense to just order online.  

I ordered a quart of sealer and a quart of satin finisher, both of which are more than enough to cover the square footage required.  In fact, I have plenty left over to do more coats if needed in the future.  

In my research of this product, I learned that it is beneficial to use a c-clamp on the can of Waterlox sealer to keep the air out.  Oxygen coagulates the liquid, so after each use, tighten the c-clamp on the can to keep the air out.  This will ensure that you can of Waterlox lasts a very, very long time.  

Also, Waterlox recommends using lambswool for application, but I just used a cheap sponge brush; the sponge does not leave residue behind, and you want to try to avoid particles getting trapped on the surface if possible.  This will happen regardless, but the sponge helps and also you can dispose of the brush after each use.

I did two coats of sealer (allowing 24 hours or more in drying time between each coat, per instructions), and then one coat of the satin finish.  I did this to both the Ikea Butcher block countertops and the island top, and in the end they came very close to matching each other.  

 By the weekend, the countertops were ready, and my brother came and installed the pendant light over the (soon-to-be-installed) sink:


The next morning, Ryan and our super awesome friend Mike installed the sink, new faucet, and the new waste disposal!


Pardon the mess. :-)

Then, because I was now an expert in door hinges, I put the doors on the sink cabinet, and you guys, it's starting to look like a kitchen again!


Let's get a closer look at that faucet (I'm in love with it):


So this is the current state of our kitchen.  It's looking real good.  Everything is so nice, we are afraid to use it!


Next up:
  • Install pantry and microwave cabinets
  • Install cabinet hardware/handles
  • Install microwave and new vent to outside
  • Backsplash
  • Open shelving
  • Decorate/Finishing touches

Monday, February 17, 2014

The Big Kitchen Update

SO MANY PICTURES.

Where we last left off:


What followed:


So!  That's where we currently stand with our kitchen rehab.  Our apron sink from Ikea is flawed (we were disappointed to discover when we took it out of the box yesterday), so we have to exchange it.  We are making really good progress though, especially now that the countertops are in!  This week my homework is to sand, stain and seal the butcher block.  

We also got an island!


It's an old carpenter's workbench that I found in a fancy resale shop.  Normally their furniture is out of my budget, but I wandered in there one day on a whim with my mother, and she came across this piece, and it was SUPER affordable.  I couldn't believe it.  It's always when you're not looking for something that you find it!

We had a few bar stools that we got for $5 each at a rummage sale that fit perfectly along the island, so I set about reupholstering them:


Not bad, eh?


So colorful.

Hello Again

I've been gone from this blog for a while.  A few reasons why:


Our dog, Rocko, passed away on August 28th.  He got very sick, very quickly, and only option for treatment was one we felt very strongly would not amount to good quality of life for him.  It was a very difficult decision, but we have never doubted we did the wrong thing.  He lived a good life with us, and he left us peacefully at home.  We miss him.

Our car was broken into, and my bag stolen with a journal in it that I had been keeping for two years.  So, that sucked.

The holidays happened.

We were very surprised to find ourselves the adopted parents of a new dog, Spencer:


He came into our lives as a foster, and never left.  He is a sweet little buddy, and we are lucky to have him.

We got a little stalled on home projects, primarily the kitchen, but in the last few weeks we have accelerated and progress has been swift.  Full updates to follow!

Monday, August 19, 2013

The Big Garden Update!

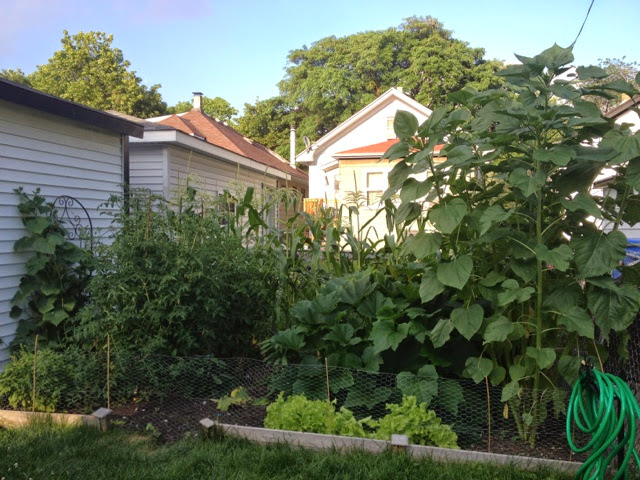
I have so many pictures to share.  Our garden has been total gangbusters.  It's crazy town.


See the giant things that are blocking the view of the corn on the right?  Those are our sunflowers.  They're at least 8' tall at this point.  We plan to harvest the seeds.


They are gigantic, cheerful, and gigantic.

Now a series of photos featuring our insane vegetable harvest!


Wednesday, July 10, 2013

It's Getting Real, Real Fast

On the morning of July 5th, our kitchen looked like this:


By the end of the day, it looked like this:


That's my brother with Ryan.  Not only did we rip out the upper cabinets, my brother installed new wiring and outlets for the stove and microwave.

In an ideal world, we would have salvaged the upper cabinets and used them in the basement to upgrade our tools/work area.  But, the cabinets were installed not with screws, but with 3" long nails.  That didn't make it easy at all to take the cabinets down.  So, it was a pipe dream, ha!

The next day, with the very able help of our friend Mike, we did this:


Goodbye, Soffit!

Guess what year the kitchen was last remodeled?  We found out when the countertop backsplash was removed, and there was newspaper stuffed behind it.

March, 1972.


So, our cabinets, and that old oven and stove, were installed when Nixon was president.  You know what else happened in March 1972?


The Godfather was released in theaters.


Mayor Richard J. Daley was Boss.

According to Wikipedia, 1972 was a leap year and "Within the context of Coordinated Universal Time (UTC) it was the longest year ever, as two leap seconds were added during this 366-day year, an event which has not since been repeated."

But, back to our kitchen.

We have removed the upper cabinets, soffit, and gotten some very important electrical work done.  Next steps: finish said electrical work, and put up drywall over the plaster from the countertop up. 

It was messy, hugely satisfying work. 


Thursday, June 27, 2013

Landscaping Progress

Now that we have landscaped along the side of the deck, the next goal is to plant in front of the deck as well.  Let's look at the deck a year ago:


Since that photo was taken, we have stained the deck, bought lattice to close up the front, stained said lattice, and as mentioned above, removed the rocks, planted and laid sod along the side of the deck.  

The other day, I bought a magnolia bush; it's called a magnolia Anne, and it will grow to be 8-10' tall.  There was a magnolia that lived in front of our old apartment building, and although the blooms only lasted a little over seven days, we loved it.  We saw it bloom for six springs; hopefully we'll see our own magnolia flower for many more.

The placement of this plant was very important.  I had to think carefully about not only where in front of the deck should it live and grow, but give it plenty of room to do so.

Once I selected a spot, I dug up the grass around the pot to mark it:


Then I dug the hole for the magnolia:


Then I proceeded to create the bed, digging up the grass (which can be hard!  Grass can be really stubborn!), trenching, and joining this bed with the one along the side of the deck.  Then I planted our gorgeous magnolia!


I also removed the lattice on the front of the deck, and installed a landscaping edger that I pulled up from along the fence when the rocks still lived there.  This would keep the rocks under the deck from getting mixed in with the landscaping.


When Ryan's family recently visited, they gave us Iris bulbs, which I planted next to the magnolia and in the corner between the side and the front of the deck.  When they grow in next year hopefully they will bloom well and fill that space.  It's a long time to wait!

At this point, a storm started to roll in; it was thundering and the sky was turning dark, so I had to be quick.  I decided to wrap things up and pull up the rest of the grass and finish the bed later.

I reinstalled the lattice and took one last quick pic before it started raining:


It doesn't look very good, but it's a start.  I only built the bed as far as the magnolia; eventually, it will stretch across the entire front of the deck.  I am going to plant one or two lilac bushes, and then transplant the peonies and some daylilies and hostas that are currently languishing in front of the house.  When I picture it in my head, it looks great!