Monday, August 19, 2013

The Big Garden Update!

I have so many pictures to share.  Our garden has been total gangbusters.  It's crazy town.


See the giant things that are blocking the view of the corn on the right?  Those are our sunflowers.  They're at least 8' tall at this point.  We plan to harvest the seeds.


They are gigantic, cheerful, and gigantic.

Now a series of photos featuring our insane vegetable harvest!


Wednesday, July 10, 2013

It's Getting Real, Real Fast

On the morning of July 5th, our kitchen looked like this:


By the end of the day, it looked like this:


That's my brother with Ryan.  Not only did we rip out the upper cabinets, my brother installed new wiring and outlets for the stove and microwave.

In an ideal world, we would have salvaged the upper cabinets and used them in the basement to upgrade our tools/work area.  But, the cabinets were installed not with screws, but with 3" long nails.  That didn't make it easy at all to take the cabinets down.  So, it was a pipe dream, ha!

The next day, with the very able help of our friend Mike, we did this:


Goodbye, Soffit!

Guess what year the kitchen was last remodeled?  We found out when the countertop backsplash was removed, and there was newspaper stuffed behind it.

March, 1972.


So, our cabinets, and that old oven and stove, were installed when Nixon was president.  You know what else happened in March 1972?


The Godfather was released in theaters.


Mayor Richard J. Daley was Boss.

According to Wikipedia, 1972 was a leap year and "Within the context of Coordinated Universal Time (UTC) it was the longest year ever, as two leap seconds were added during this 366-day year, an event which has not since been repeated."

But, back to our kitchen.

We have removed the upper cabinets, soffit, and gotten some very important electrical work done.  Next steps: finish said electrical work, and put up drywall over the plaster from the countertop up. 

It was messy, hugely satisfying work. 


Thursday, June 27, 2013

Landscaping Progress

Now that we have landscaped along the side of the deck, the next goal is to plant in front of the deck as well.  Let's look at the deck a year ago:


Since that photo was taken, we have stained the deck, bought lattice to close up the front, stained said lattice, and as mentioned above, removed the rocks, planted and laid sod along the side of the deck.  

The other day, I bought a magnolia bush; it's called a magnolia Anne, and it will grow to be 8-10' tall.  There was a magnolia that lived in front of our old apartment building, and although the blooms only lasted a little over seven days, we loved it.  We saw it bloom for six springs; hopefully we'll see our own magnolia flower for many more.

The placement of this plant was very important.  I had to think carefully about not only where in front of the deck should it live and grow, but give it plenty of room to do so.

Once I selected a spot, I dug up the grass around the pot to mark it:


Then I dug the hole for the magnolia:


Then I proceeded to create the bed, digging up the grass (which can be hard!  Grass can be really stubborn!), trenching, and joining this bed with the one along the side of the deck.  Then I planted our gorgeous magnolia!


I also removed the lattice on the front of the deck, and installed a landscaping edger that I pulled up from along the fence when the rocks still lived there.  This would keep the rocks under the deck from getting mixed in with the landscaping.


When Ryan's family recently visited, they gave us Iris bulbs, which I planted next to the magnolia and in the corner between the side and the front of the deck.  When they grow in next year hopefully they will bloom well and fill that space.  It's a long time to wait!

At this point, a storm started to roll in; it was thundering and the sky was turning dark, so I had to be quick.  I decided to wrap things up and pull up the rest of the grass and finish the bed later.

I reinstalled the lattice and took one last quick pic before it started raining:


It doesn't look very good, but it's a start.  I only built the bed as far as the magnolia; eventually, it will stretch across the entire front of the deck.  I am going to plant one or two lilac bushes, and then transplant the peonies and some daylilies and hostas that are currently languishing in front of the house.  When I picture it in my head, it looks great!


Thursday, June 20, 2013

Why One Should Check the Gutters


You could have a clogged up downspout (not me, a friend...) that was so full with dirt, leaves and moisture that it starts to grow it's own plant.  INSIDE THE GUTTER.

Night and Day

As I mentioned briefly in this post, one of my goals for this summer is to remove the mess of landscaping rocks that live next to our deck.  It's unsightly!  I really dislike it.  I wanted to turn it into a beautified space--so I did!

True to form, I didn't take a proper "before" photo--but here is the area after we started, and I think it gives an idea of how ugly it was, and also the enormous task at hand.


The landscaping fabric underneath the rocks was so old, weeds thrived between the rocks; many of the rocks somehow slipped underneath the fabric, so when we pulled it up, there was a whole other layer of rocks to deal with.  Also, after the all the changing seasons and rains and snows, the rocks were mostly dirty, making this space appear far from clean.

Ryan and I managed to clear the area of rocks in one afternoon--it was not easy, but we did it.  The top layer of rocks, the ones most becoming, we hauled in one-bucket shifts to our shed, and laid them as a small border around it.


It might be hard to tell from these pictures, but the shed looks really cute with these rocks around it.  It's a small border, so it will be easy to maintain.

Once just about all the rocks were removed, we found several stepping stones buried under the landscaping fabric.


I LOVE finding stuff like this--it's a boon to find things that we can use.  We put one of these stones in front of the shed as a front step, and stored the rest inside the shed after hosing them all down.  I'm sure we'll find a use for them at some point.  They are nice, heavy, concrete stones--they could not have been cheap.  

Rocks--be gone with you!


A couple of days later, I picked up some forsythia shrubs and catmint--all perennials--from Home Depot, trenched a new bed, and prepared to plant:


I did this on a Monday evening, and it was literally a race against the setting sun!  The sun had already dipped below the horizon when I finished, with barely any light to admire my work.  

A couple of days after that, we bought some sod, and hurrah!


I'm very proud of the transformation.  It looks soooo much better.

Tuesday, June 11, 2013

Garden Check-In

Our garden as of June 8th:


Our sunflowers and corn are thriving!  Especially our tomatoes and zucchini.  It's been raining a lot, and I kid you not, these plants get noticeably bigger every day.  I have only used Miracle Grow twice in the weeks since I planted.


We also got a fancy hose stand for the vegetable garden:


We try to water the garden primarily from the rain barrel, and with the frequent rain we've had, there's been no shortage--the other night it rained so much our rain barrel overflowed!

Monday, June 3, 2013

The Hidden Treasures (and/or problems) of Rehabbing

See the cabinet to the left of the stove?  It's GONE.  


We found things when we pulled the cabinet out.  We found a spatula!


What appears to be a flattened penny:


And a perfectly preserved prayer card.


So, here's the problem, or problemzzz.


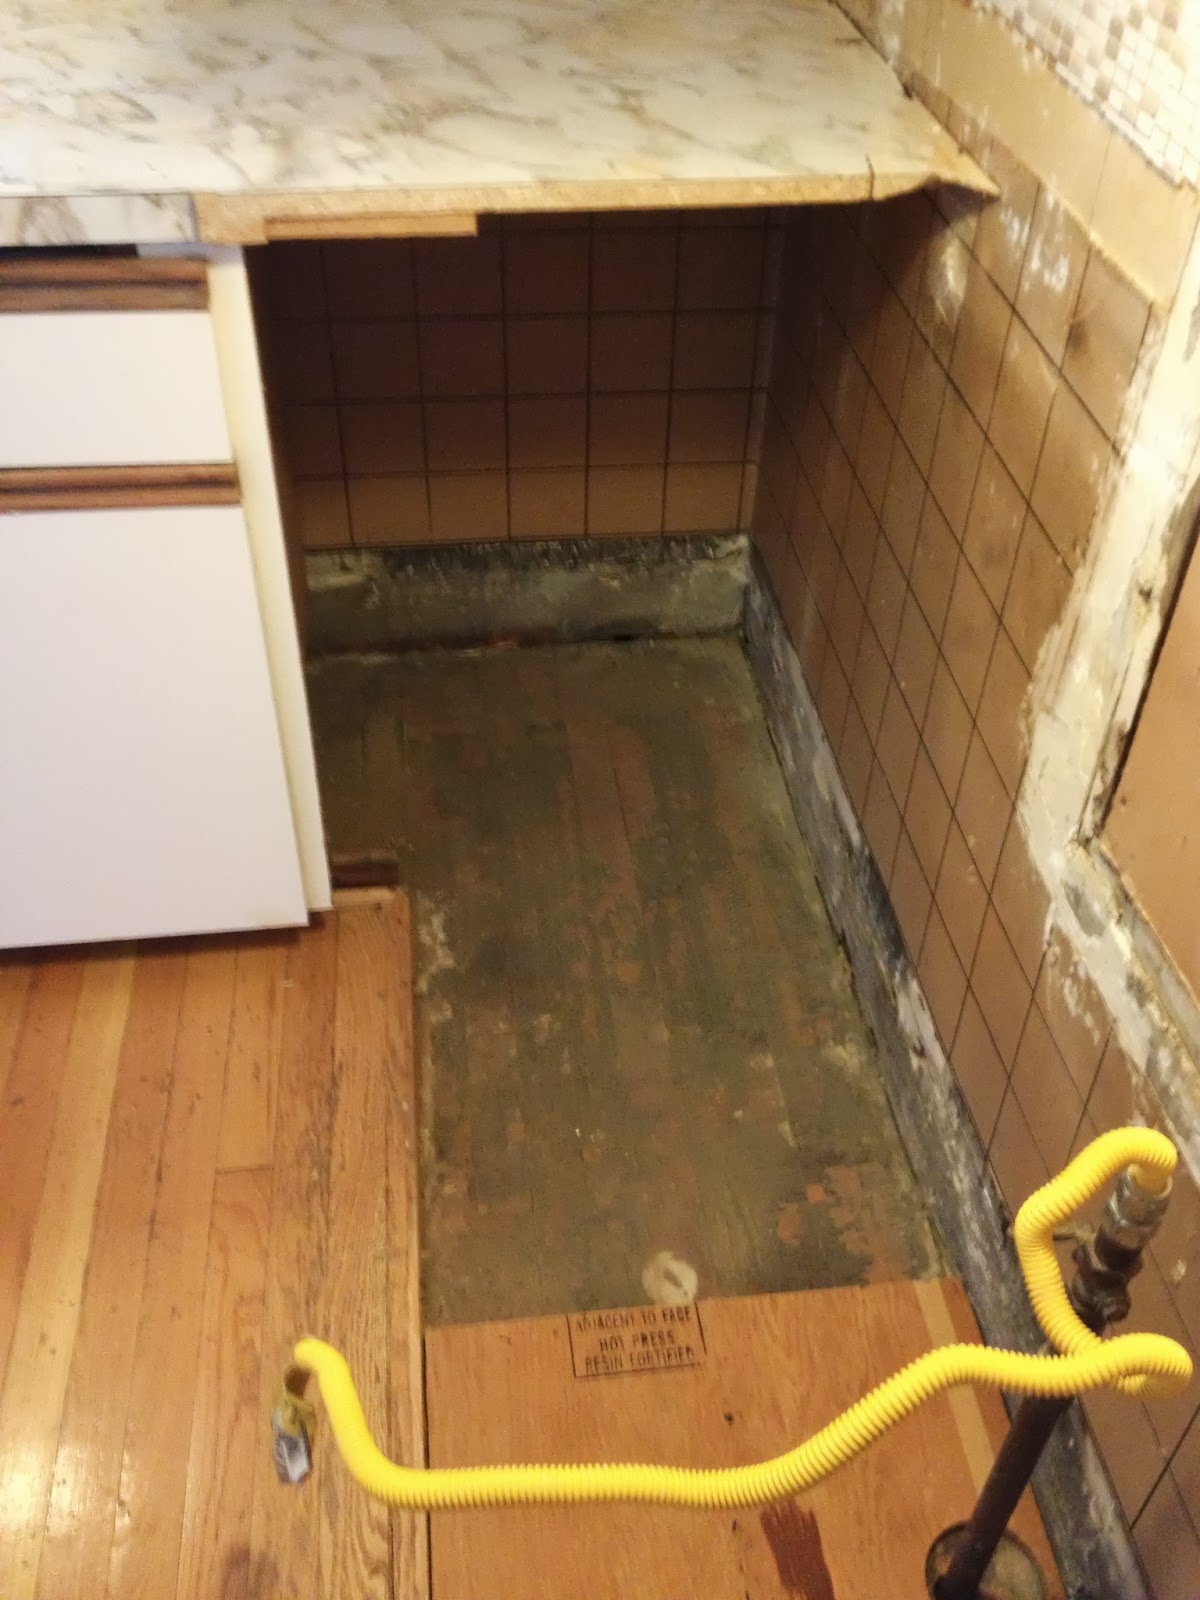
When our current cabinets were installed, they didn't install the hardwood flooring all the way to the wall.  So the floor isn't level.  Thanks geniuses!  

I mean, it's cool seeing the original hardwoods underneath our current flooring, but why did they do this?  What were they thinking?  As a temporary solution, we cut pieces of the old cabinets to fit and make the floor a *little* more level.  

There's also the problem of the window that used to be in the kitchen:


It's a bit of a mess, and will need to be re-sealed.  Also, it appears the current walls in the kitchen are plaster (our house was built in 1911, so this is not surprising), and we're not sure what to do about that. Do we knock down the plaster and replace the drywall?  Do we dry wall over the plaster?  

Also you'll see an outlet to the right of the old window.  It's too far for the new oven to plug in.  So that will have to be addressed as well.  Thank goodness my brother is an electrician.

Finally, the gas line is too tall for our new oven.  The main line will need to be turned off, and the current pipe replaced with a shorter one (as well as a new shut off and flex line put on).  Thankfully my dad know how to do this.  

Yesterday I had some time to kill so I worked on removing the tile from the backsplash:


Some of it came up very easily, and others were one-tiny-tile-at-a-time, hand-cramping sticklers.  I made a small dent.


I also poked around the soffit.  I've been very curious to see if they drywalled over the woodwork of the door to the upstairs, or the other way around.


Disappointingly, they chose to cut the wood to fit the soffit.  Dammit.


This can be fixed, we can have a piece cut to fit the part that's missing, and stain and secure it to the wall, but still.  It's a bummer.

But it's not ALL bad news, guys!  We made progress, which is good.  We identified problems, which is good.  We are devising solutions, which is good.  Aaaand, we bought another cabinet--this time the big pantry cabinet from Ikea, which will go right next to the stove.  Yay!  We only have one cabinet left to buy, the small one that will fit over the microwave.  We have just about all of our major purchases complete...although I should probably look into how much drywall costs...and figure out how to install it.